Thursday, August 4, 2011

Vanity Makeover

Today I wanted to share a project I've been working on in pieces for awhile. It is part of my bedroom makeover, and is really what inspired the makeover for the whole space. It started with a white vanity from Target (only mine cost a whopping $25 for the vanity AND the matching bench from Craigslist) and looked like this:

Here it is after I removed the mirror from it, which I thought made it look a little bit "younger" than the look I was going for. 


I then took it outside for sanding and a coat of pretty yellow spray paint. 
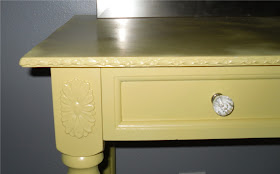
And here is the finished product! I absolutely love how it turned out and think the covered bench in one of my new fabrics really helps to modernize it. 


The fabric for the bench is Duralee Dahlia Fabric in the Aegean colorway. I will share the process I used for covering the bench next week. I love that it opens up for storage underneath! 


I love the details on it, including the crystal knobs that came with it. 


Not bad for $40 for the set and materials, huh? 


Friday, July 29, 2011

Friday Favorites

I thought I would start a new blog feature that showed off some of the favorite things found throughout blog land this week. One of my favorite things about blogging is all of the great inspiration available! Here is what is inspiring me (and I'm pinning!) this week! 

I'd love one of these for the bedroom makeover I'm planning but in a smaller size. I wonder what I could use instead?


I plan on making one of these with a J on it! Isn't it genius?!


I smell bridal shower gift! 


 I need to figure out SOMEWHERE in my house to do this. Why am I suddenly considering painting a spare bathroom teal just to use this idea?


Oh.My.Gosh. I'm suddenly so sad I don't have a bar cart in need of a makeover lying around. However, I do have a vanity just begging for a cute monogrammed tray to put on top... :) 


How amazing are these lamps? I'm dying for a set for again, my master bedroom. Has anyone else tackled wiring their own lamps?


What were your favorite projects this week? I'd love to see them! 


Monday, July 25, 2011

Master Bedroom Makeover - E Design Inspiration Board

I have been debating for a long time what I wanted to do to makeover my master bedroom, and I've finally come up with a plan! Here's the inspiration board I created:


The jumping off point for this was the Duralee Dahlia fabric in the Aegean colorway. Once I found the Premier Prints Zig Zag in Yellow and the Waverly Lovely Lattice in Lagoon, I had my color palette and I figure the mix of soft tiffany blues with a vibrant yellow will be both relaxing and fresh. I will paint the walls a pale grey and use the rest of this board as inspiration to tie in the metallic and crystal accents. 

I've got a furniture makeover, headboard tutorial and curtain treatment all planned for this room, so stay tuned! Happy Monday everyone!


Saturday, July 23, 2011

Summer Party Printables

Hello bloggy land! I have been away on an extended absence, but haven't forgotten about this blog! Between work, summer weddings and parties and of course tons of DIY projects, unfortunately my blog has taken a backseat. However I'm back to share with you some free printables (and who doesn't love those?!) as a thank you for sticking with me :)

I am currently in full on planning mode for a couples shower for one of my best friends. They are getting married in Key West later this year, and so I have decided to throw them a nautical preppy themed shower. In the prep for this, I have made tons of custom printables for the party including the invitations, food tents, monogrammed cupcake toppers and of course, favor tags in a fun hexagon shape. I thought I would share the favor tags here with you to download for any summer bashes you may be throwing! I have included a couple of fun color/pattern combos below. 


Just click the links to download the pdf's from 4shared. For the shower I'm throwing, I'll be using the navy, green and yellow tags and tying them onto clear bags filled with sand and wrapped lifesavers tied off with twine to go with the nautical theme. I'd love to see the favors you create, so please come back and share in the comments! 

Happy summer everyone!

(Linking up at Home Stories A to Z!)

Thursday, June 16, 2011

Monday, June 13, 2011

My BFF Spray Paint


I've made no secret of my love for spray paint. Today I thought I would share some of the things in my home I've made over using the heaven in a can :)

First up is these book ends. I loved the large shape of them, but the wood didn't really match the room I wanted to use them for.


 *Do you spy that can of silver metallic in the background?


With a little paint they turned into these lovely silver book ends for my office:


Some of the other things I don't have "before" pictures of because I did them before starting blogging. This mirror was light gold and very chipped before I started. 


Next up is this teal lamp. It was a brown faux wood before. I found the pair at a consignment shop for $10.


And of course, let's not forget the furniture I've made over for my house:


I have a couple more furniture projects up my sleeve to show you later this week using the transformative powers of spray paint. What are your favorite projects using spray paint? I'd love to see em!

Friday, June 10, 2011

Fabric Covered Cork Board

I recently completed a quick easy project for my bonus room crafting area. I wanted something to hold various invites, fabric samples, and mementos. A place for anything that inspires me! What better way than re-purposing something you already have? I took this beat up mirror...


And turned it into this lovely fabric cork board!


I followed the basic tutorial from 6th Street Design School.* It was as simple as busting out the mirror and taking out the wood backing, spray painting the frame, attaching cork tiles the wood backing (I did it using scotch tape!) and covering the whole thing in fabric. The fabric used in this project is Waverly Ellis Flamingo. Then you just pop it back into the frame and you have a great new place for tacking anything and everything. 

*Without the fabulous starburst mirror! Need!

Here it is above my craft desk!*


*See those fabulous teal lamps? I'll share those with you next week :)  

Happy Friday everyone! Hope you have a project-filled weekend! 

I'm joining Remodelaholic's Friday linky party!
Go check out all of the amazing inspiration!


Wednesday, June 8, 2011

Stylish Substitute: Anthropologie vs. Target bedding

I'm back today with another Stylish Substitute, and again, this one is from Target! (disclaimer: I have an unreasonable addiction to the retailer!)


Obviously, the Target version does not have the knotted gathers, but I think it still packs the same charm for much less moolah. The Anthropologie version goes for $268 vs $79.99 for Target's copy. Both come in a array of colors. What do you think? Would you go for the Target lookalike or splurge on the real thing?

Tuesday, June 7, 2011

Bandana Framing and Gallery Wall Progress

I recently ordered this print from Poster Revolution to start the gallery wall process in my office.


It is an odd size, 13x9, so I had trouble finding a frame that fit. I stumbled upon the idea for an easy solution while out at Hobby Lobby last weekend. I simply bought a bigger frame (16x20 size) and a bandana, and came up with this! 


I could have used the fabric I already bought to go in the room, but I wanted to save it for pillows and my chair redo and this bandana was only $.99. Goes great with the fabric I already have, and I love the finished product. 

I've also made some progress on my gallery wall for my office. Wanna see?


I obviously have a lot more to go. I am searching for the perfect prints for the smaller frames, and want to make over a cardboard J for the empty spot on the right hand side of the arrangement. 


What do you think? 


Linking to today's Terrific Under Ten Tuesday over at Kindra's blog! 


Also, thanks to Kindra for featuring my Desk Chair Makeover from last week!


Thursday, June 2, 2011

Wasabi Crusted Salmon Recipe

I don't know about you, but I'm a huge salmon fan. Add wasabi to the mix and I'm hooked! Here is a quick and easy (under 20 minutes and 5 ingredients!) recipe for my favorite Wasabi Crusted Salmon. 


2 salmon fillets
4 tablespoons light mayo
2 teaspoons wasabi powder
Sprinkle of garlic powder
1/2 cup panko or regular breadcrumbs


1. Preheat oven to 375 degrees and thaw salmon. 

2. Mix mayo, wasabi powder and garlic in a small bowl.

 It'll look a little something like this!

3. Place salmon fillets on a foil-lined baking sheet and spread with mayo mixture.

4. Sprinkle with breadcrumbs. 

Looks tasty!

5. Bake for 10-15 minutes or until salmon is cooked through!

Wahlah! A delicious, low calorie fish dish. 

 The breadcrumbs get crunchy. Yum! (Dishes are from here.)

What's your favorite way to cook fish?


I am joining the Friday Remodelaholic party! Go check out all of the great inspiration!

Wednesday, June 1, 2011

Pinterest

I'd love for you to come follow me on Pinterest! I'm also working to add a button to my sidebar. I'll be tagging many wonderful DIY projects that catch my eye as well as some gorgeous rooms from my favorite bloggers!


Also, I did a little redesign of my blog to make it a little more "me". What do ya think?

Tuesday, May 31, 2011

Desk Chair Makeover

Happy Tuesday fellow bloggers! Sorry for the absence, last week was a crazy week for me. I had two birthdays, a work dinner, a wedding, a bbq and month end at my job. Unfortunately, blogging had to take a backseat because life got in the way! However I am happy to be back today and showing a project I completed over the weekend.

It all started when I found this chair on Craigslist for a whopping $5 bucks. 


It looks much better in this photo than it did in real life. The finish was scraped and scuffed, and the blue and white striped seat cover was faded and stained. See?


I knew it was nothing a little bit of spray paint and new fabric wouldn't fix. I started by taking the seat off with a drill and hauling the chair frame outside for some sanding and cleaning. Here it is all ready for it's makeover! 

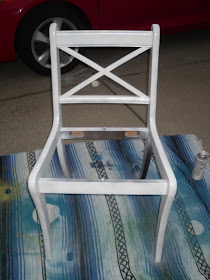
Next, I coated it with two coats of white spray paint to match the desk already in my office. Here it is after (almost*) one coat. 

*Yes, I ran out of paint mid-project. I had two half cans laying in my garage and unfortunately that wasn't enough. That's ok, when Sunday rolled around I was able to finish her up! 

In the mean time while I was waiting for the paint to dry, I turned my attention to the seat. I already had the fabric on hand as I ordered it to match the bigger side chair already in my office to make coordinating pillows and curtain trim out of. The seat was already plenty cushioned, so I just flipped it over, cut the fabric to size and stapled it to the seat. I'm not the best upholster-er in the world, but I can't handle minor seat cover changes. 


The next day, I finished spraying my chair and reattached the seat. Here's the finished product!*

 *After I got it in, I realized that left leg needed a big more attention. See it? That's what happens when you spray paint in very bright sunlight :p

Now this chair coordinated well with my side chair. The fabric is an exact match, just in a smaller scale.


The pillow is from Home Goods. 
 
See those too-short curtains in the pic above? Those are my next victim :)

There you have it! It's amazing what $10 bucks and a couple of hours can do for a piece. Did you work on any fun projects this weekend?

I'm participating in the Terrific Under $10, Tuesday's Treasures, and Tutorial's and Tips Link Parties today! Go check out some of the fabulous projects!


My Uncommon Slice of Suburbia