Friday, December 21, 2012

Stylish Substitute: Skyline Furniture Armless Chair vs. Armless Upholstered Slipper Chair

Today's Stylish Substitute is a dead ringer! I absolutely love this chair, and even considered adding a pair to my living room, but ended up going with the settee instead. 


I love Wayfair and have purchased several things from the store, but there is no denying the Target option is a better alternative when it comes to cost. Have you found any great Stylish Substitutes lately?

Thursday, December 20, 2012

Christmas Wreath Card Holder Tutorial

As I'm sure many of you around this time of year, the lovely Christmas cards from my friends and family were starting to pile up. I normally just put them up on the refrigerator, but this year I decided I wanted to do something a bit more special! If you're looking for a good place to display yours and have an extra wreath laying around, this is the project for you. 

I started out by gathering some supplies: a few clothes pins and some metallic markers. The metallic permanent marker actually seemed to work better than the paint marker in this case.


I then simply drew some simple stripes and polka dots on one side of the pin. I am no artist by any means, but this couldn't have been more simple. When I was finished, they looked like this:


I then simply clipped onto a card and then onto my wreath. I made a quick floral bow out of wire ribbon and called it done! 


This project took me less than 10 minutes and gives me a smile every time I walk by it. Have you done any quick Christmas projects just in time for the holiday? 


Wednesday, December 19, 2012

New Fabrics & Furniture


I've been in the process of updating my living room and recently purchased some new coordinating fabrics.

 (Ignore my sock foot)


I am thrilled with the mix and think they will bring some vibrant colors into my otherwise neutral space.


Another new purchase is this settee. I first fell in love with this beauty after seeing it on Megan's blog and I knew it would be perfect for my new space. I think it's a killer deal for the price (currently on sale for $224.99!) and the quality is very good. I threw two of the fabrics on it to see how they would look as pillows and I think once they are finished and I drape a throw over the back, this little space will be perfect. I believe the Maasai Mara fabric is going to become trim on my curtains. 
 
Have you purchased anything new for your spaces lately, big or small?

Monday, December 17, 2012

Christmas Home Tour

Welcome to my Christmas Home Tour! I can't wait to show you around. 

The holiday season is one of my favorite times of year, hands down. When January rolls around and I have to take down the Christmas decor, I feel a bit depressed! 
  
This year I decided to decorate with various metallics. Mixes of gold, silver and rose gold in a mix of finishes including glitter, matte and shiny. 

The large garland on my Christmas mantle was a DIY I did a few years back. Simply take various strands of faux garland and weave together. I used a few different styles of garland to give it a more dimensional, real look. I sprayed pine cones silver and gold and tucked them around the garland.


I had these berry stems that were previously red that I sprayed gold. The vase is from Target. The silver tinsel tree is several years old from the dollar store. The glass cheese dome is an estate sale find that I simply filled with a mix of pretty ornaments.


On the other side of the mantle, I filled a large glass Ball jar with more ornaments. This was an estate sale find earlier this year. The wire tree is a simple DIY using floral wire and the large silver tinsel tree is another dollar store find. 


Moving around the room to the star of the show, the Christmas tree. I decked it out in a mix of round bulbs, special baubles, DIY ornaments and glittery dollar store finds. I'll show you some close-ups of my couldn't-be-easier DIY's next week.


The tree topper is a DIY inspired by The Hunter Interior's gorgeous topper. Mine isn't quite as tall or large, but using what I had around the house, I think it's perfect. Yes, I already had a disco ball laying around :)


Here is a side table that I got for a steal at Target. I topped it with a wreath and some wrapped gifts. Who says all of the presents have to go under the tree?! Put them on other surfaces in your home and spread some of the pretty around.


 Large bookcases in my living room hold some pretty DIY Christmas trees I made. The gold ornament tree was made using hot gluing ornaments into a styrofoam cone and then stringing thin garland in the spacing. I simply wrapped tinsel garland around styrofoam cones to create the smaller silver trees.


Here's a shot of the presents nestled under the tree. I used a mix of brown craft paper, newspaper print wrapping paper, and metallic gold and silver. I think mixed coordinating bows, bells, twine and ribbons in to give it an eclectic but coordinated feel.

This is a little display I created for a sofa table that sits next to the tree. I used one of my vintage milk glass platters, more spray painted pine cones, and various ornaments and bells. Those rose gold ornaments may be my favorite. They are from Hobby Lobby. 

Here is more of these painted pine cones! I can't get enough of the rustic glam look they provide.


Moving upstairs, here is the tree in my home office. I work from home and spend most of my time here, so I saw no reason not to bring a little Christmas cheer upstairs. As a complete departure from my main tree, I decided to use the bright jewel tones found in my office already and bring them on to the tree. I love the gradient effect of placing ornaments of the same color in rows around the tree. The topper is made of a cardboard letter from Hobby Lobby spray painted silver. The "tree skirt" is the Missoni for Target Passione throw simply draped around the tree.

 Continuing the jewel tone theme, I created some yarn trees with leftover purple and pink yarn for my desk. The mirrored tree is another dollar store find from a few years back (I'm starting to sense a theme?!). I'll be back next week with the almost-too-simple-to-create-a-tutorial tutorial for these easy trees. 

Thanks for checking out my home tour! I'd love to see yours, so please link in the comments! 

I've linked up to:


Friday, December 14, 2012

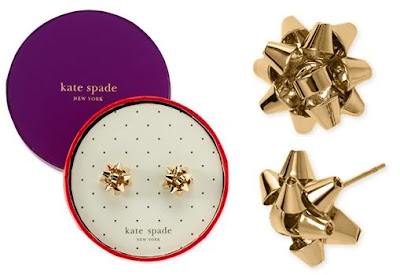
Stylish Substitute - Kate Spade Bourgeouis Bow Earrings vs. Kohl's Holiday Collection Bow Earrings


I'm back today to share one of my favorite blog features titled Stylish Substitute. This is in the vein of a look for less, where I will showcase a great find and then a cheaper alternative.

Today's post is a jewelry find that's a major steal!


Kate Spade Bourgeois Bow Earrings, $46 

(no longer available through Kate Spade, but the most recent completed listing on eBay went for $210!)

Kohl's Gold Tone Bow Button Stud Earring, on sale for $2.99


Once you use Kohl's frequent % off coupons, you might as well be getting these babies for free. They also come in silver and red tone. I have both the silver and gold and they get constant wear throughout the season.

 Have you found any great stylish substitutes lately? I'd love to see them!  


Thursday, December 13, 2012

Back to the Blogging World - Easy Christmas Bow Shadow Box

Wow, it sure has been a long time since I've posted! Rest assured, my absence had nothing to do with projects not being done around here. I've had a ton going on I can't wait to share with you!

Today I thought I'd share a quick and simple Christmas project I recently completed. I am more than willing to tackle all projects, both big and small, but sometimes I just love the simplicity of keeping it short and sweet - especially when it turns out this darling! 


Items needed:

Shadow box
Cardstock, color of your choice
Petite Christmas Bows (I found a pack of 9 at the dollar store)

1. Open your shadow box and take out the insert it comes with. 
2. Trim your cardstock to size, using the frame insert as a template. 
3. Peel backing off bows and stick to cardstock, evenly spaced. 
4. Place cardstock back in shadow box and enjoy!

As you can see from the instructions, this project couldn't have been more simple to complete. Being as I already had the shadow box and cardstock, the project set me back about a $1. You could easily customize this to your decor with different color cardstock, mix and match bows, even painting the frame!

This would look adorable on a mantel or as part of a larger vignette in your home. The possibilities are endless! 

Here it is hanging on the wall in my home office. Warning: it may be hard to focus on the frame with such cute subjects in the foreground :)


What about you? Have you completed any quick and simple Christmas projects lately? I'd love to check them out!